
Auf dieser Seite finden Sie die Mures Hidraulici Service Handbuch. Sie können eine PDF Downloaden mit den unten stehenden Link:
 Service Handbuch (Service Manual) - English | PDF |
WARNING Before you work on or remove hydraulic cylinders: Lower all components and support any raised parts. Make sure there is no residual pressure in the cylinder. Plug all lines and connections to prevent the entry of dirt. Take precautions to protect the hoisting straps from contact with sharp objects.
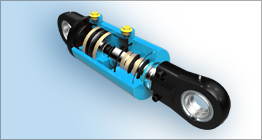
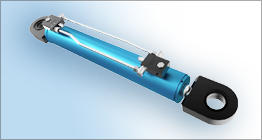
Figure 1. Names of cylinder parts

General instructions for work on hydraulic cylinders
- Always perform the work in a clean environment, with clean parts.
- Check for scratches in the cylinder tube and on the piston rod. New seals can be damaged or cut by such scratches.
- Remove burrs and sharp edges from the piston and guide before assembly to prevent scratches in the cylinder tube.
- Check all the O-rings, seals and guide rings for cuts and wear before assembly; replace if necessary.
- Tighten the lock nut with the specified torque. (See table 1)
- Pay attention to the proper orientation of the seals during assembly. (See figure 2)
Table 1. Torque specifications

Disassembly of the cylinder
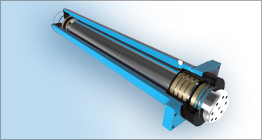
The best way to disassemble a cylinder is to clamp the cylinder in a vice in the vertical position with the piston rod pointing upwards. Place a drain pan under the cylinder to capture any oil released during disassembly of the cylinder. Use the correct size spanner to unscrew the guide from the cylinder tube. Remove the rod assembly; use a hoist if necessary.
Attention When the rod assembly is removed, oil may be released from the oil connection on the rod side. The cylinder tube must be retained securely to prevent it from coming loose during removal of the rod assembly.
Once the rod assembly has been removed, it can be disassembled in order to replace the various seals and O-rings. Clamp the piston rod in a vice with soft jaws to prevent damage to the polished surface of the rod. Remove the lock nut from the end of the rod (in the case of a threaded piston, the piston can be unscrewed from the rod).
Attention It may be necessary to insert a bar through the eye of the rod head/attachment and rest it against the workbench to prevent the rod from turning during removal of the lock nut. Once the lock nut is removed, the piston and the guide for the piston rod can be removed.
Figure 2. Naming of the seals

Seal replacement
Use the correct seal set for the cylinder you are working on, and replace the seals and O-rings on the piston and guide. For correct placement of the seal, see figure 2. Make sure there is no damage on the rod or seat that may damage the new seals.
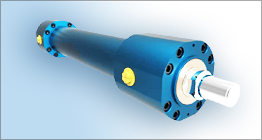
Assembly hydraulic cilinders
Clamp the rod in a vice with soft jaws to prevent damage to the polished surface of the rod. Install the guide and then the piston on the rod, then tighten the lock nut.
Attention It may be necessary to insert a bar through the eye of the rod and rest it against the workbench to prevent the rod from turning during tightening of the lock nut.
Once the rod assembly is complete, the assembly can be installed in the cylinder tube. Once again, the best method is to place the cylinder tube in the vertical position and lower the rod assembly into it. Make sure all the seals are properly lubricated before assembly. Once the rod assembly is installed, the guide must be tightened with a spanner. The guide is designed to be tightened against the cylinder tube.
Replacement of the spherical bearing
Removal
If there are circlips present, these can be removed with the appropriate tool. The old bearing can be driven out with a suitable drift-pin punch and a hammer.
Installation
The recommended method is to freeze the new bearing in dry ice or liquid nitrogen to cause the bearing to contract (freeze for at least 1 hour for dry ice, 5 minutes for liquid nitrogen). It may be easier if the eye is heated to 65 °C prior to installation. Check prior to freezing the bearing whether there is a 0.04 to 0.05 mm press fit. If not, the bore must be built up and machined to the correct size or new parts must be used. Once the bearing has been cooled and (optionally) the hole heated, the bearing can be installed in the hole; make sure the bearing is centred in the hole. When the bearing warms up it will become secure in the hole. If present, the circlips can be installed with the appropriate tool.
The cylinder is now ready to be tested and, if it passes the test, to be installed on the machine.